
Ready to unlock the world of homemade edibles? It all starts with one essential ingredient: cannabis butter. This is the golden ticket to crafting everything from legendary brownies to savory infused dinners, right in your own kitchen.
Mastering “cannabutter” is a simple art of patience. It’s a process of gently heating cannabis to unlock its full potential, then slowly infusing that magic into high-quality butter. The secret isn’t fancy equipment; it’s the low-and-slow approach. This method protects the delicate compounds, ensuring your final product is potent, flavorful, and free of the burnt, grassy taste that plagues amateur attempts.
Your Guide to Perfect Homemade Cannabutter
Forget intimidating recipes and confusing science. This guide is your roadmap to success, offering actionable insights and foolproof steps. Whether you’re a first-timer or looking to perfect your craft, we’ll walk you through everything you need to create consistently excellent cannabutter.
Once you master this technique, you hold the key to an entire universe of cannabis cuisine. This single skill empowers you to transform any recipe into a personalized edible experience.
The Rise of Homemade Edibles
It’s no secret that homemade edibles are taking center stage. As part of the cannabis market’s explosive growth, kitchens everywhere are becoming creative hubs for cannabis cooking. The demand for a customized, high-quality experience is driving more people to take control and make their own infusions.
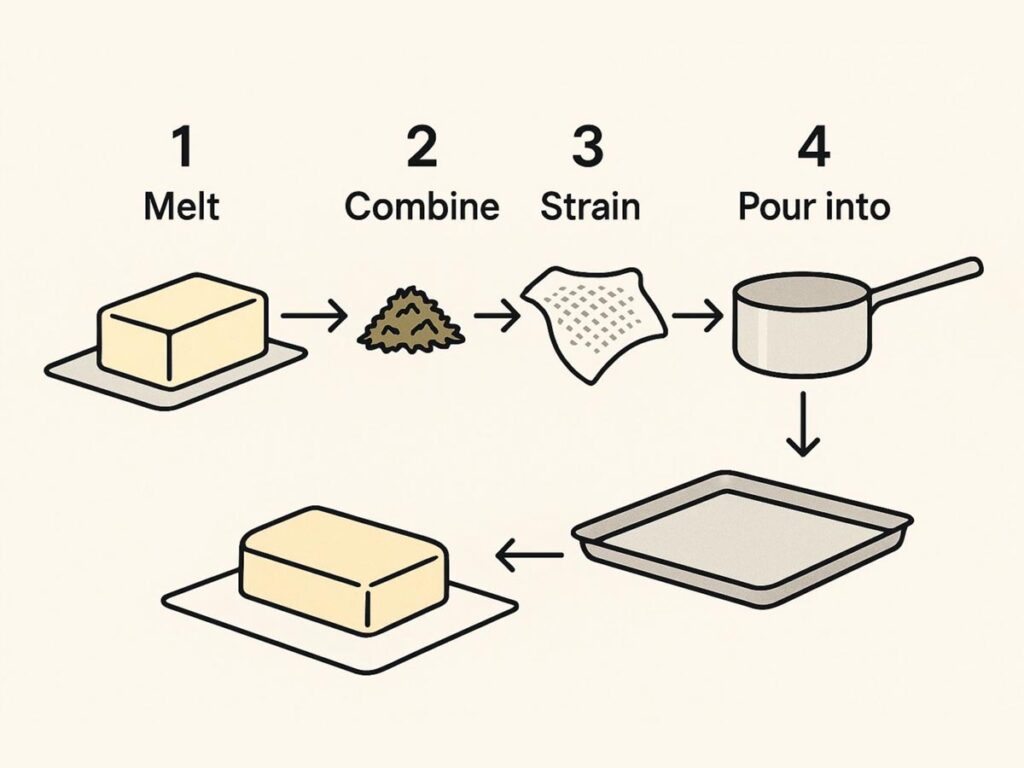
To give you a clear picture of the journey ahead, here’s a practical breakdown of the entire process.
Cannabutter Process At a Glance
| Stage | What It Achieves | Key Tools Needed | Estimated Time |
|---|---|---|---|
| Decarboxylation | “Activates” raw cannabis to make its compounds bioavailable. | Baking sheet, oven, parchment paper. | 30-45 minutes |
| Infusion | Saucepan or slow cooker, strainer, and jar. | Saucepan or slow cooker, strainer, jar. | 2-4 hours |
| Straining & Storage | Separates plant material, leaving pure, potent infused butter. | Cheesecloth or fine-mesh sieve, airtight container. | 10-15 minutes |
This table isn’t just a summary; it’s a promise. With a few simple steps and a bit of patience, you’re perfectly positioned to create a high-quality infusion.
Why Make Your Own Cannabutter
Crafting your own cannabutter is about one powerful concept: total control. When you’re the chef, you dictate every aspect of the final product, transforming your edibles from a guessing game into a reliable, tailored experience.
- You Control the Potency: Need a gentle, relaxing buzz or a more profound effect? You decide the exact cannabis-to-butter ratio, ensuring every dose is predictable and perfect for you.
- You Pick the Strain: This is where the magic truly happens. Select a calming indica for a restful evening, an inspiring sativa for a creative afternoon, or a specific strain to address therapeutic needs. The power to choose is yours.
- You Use Better Ingredients: Say goodbye to mystery oils and artificial additives. You can select premium, unsalted butter and fresh, high-quality flower, which translates directly to a superior taste and a cleaner experience.
- You Save Money: Let’s be practical—dispensary edibles can be costly. Making your own cannabutter is significantly more budget-friendly, empowering you to enjoy your creations without breaking the bank.
Key Takeaway: The true beauty of homemade cannabutter lies in its simplicity and versatility. By mastering this foundational skill, you unlock the ability to turn almost any dish into a personalized edible. This guide is designed to be your trusted kitchen companion, ensuring you succeed from your very first batch.
Gathering Your Kitchen Tools and Ingredients
Before we dive into the process, let’s set ourselves up for success. Great cannabutter begins with great preparation. Having your tools and ingredients ready transforms the experience from a complex chore into a relaxing, creative cooking session. The best part? You likely already own everything you need.
Think of this as building your foundation. A little organization now ensures a seamless and stress-free infusion later.
Choosing Your Core Components
The two stars of the show are, of course, the cannabis and the butter. The quality you choose here will directly impact the potency, flavor, and texture of your final product. Let’s make sure you select the best.
For butter, your best choice is unsalted, high-fat butter. Here’s why that matters: Cannabinoids like THC are lipophilic, meaning they are “fat-loving” and bind directly to fat molecules. More fat in your butter provides more anchors for these compounds, leading to a more potent infusion. Using unsalted butter also gives you complete control over the final seasoning of your recipes.
For cannabis, the strain is your creative palette. An indica-dominant strain will likely produce a more relaxing, body-focused effect, while a sativa may deliver a more cerebral, energizing experience. There is no right or wrong answer—it’s about the outcome you desire. To understand the science behind these compounds, you can explore the basics of cannabinoids on a trusted resource like Wikipedia.
This infographic provides a clear, visual checklist of everything you’ll need.
With these five essentials—butter, coarsely ground cannabis, cheesecloth, a baking sheet, and a saucepan—you are perfectly equipped to begin.
Your Essential Supply Checklist
Beyond the two main ingredients, a few common kitchen tools are necessary to bring it all together. Let’s do a quick inventory:
- Oven and Baking Sheet: Essential for decarboxylation, the critical first step to “waking up” your cannabis.
- Grinder: A basic hand grinder is ideal. You are aiming for a coarse grind—think oregano, not fine powder. Grinding too finely allows unwanted plant matter to slip through your strainer, resulting in a gritty texture and a grassy, bitter taste.
- Saucepan or Slow Cooker: Your infusion vessel, where the butter and cannabis will slowly meld together.
- Cheesecloth or a Fine-Mesh Sieve: This is non-negotiable for separating the plant material. It’s the secret to achieving clean, pure, and professional-quality cannabutter.
- Airtight Container: For storing your finished product. A glass jar with a tight lid is perfect for maintaining freshness.
Pro Tip: Don’t feel the need to invest in specialized equipment. The goal is to be prepared, not to overcomplicate the process. Simple, everyday kitchen tools, used with precision, are all you need to produce exceptional results.
Unlocking Potency with Decarboxylation
If you remember only one thing from this guide, let it be this: decarboxylation is mandatory. This scientific-sounding term describes a simple process: gently heating your cannabis to “activate” its compounds. It is the single most critical step for making cannabutter that delivers the desired effects.
Raw cannabis flower contains a compound called THCA, which is non-psychoactive. It requires heat to convert into THC, the compound responsible for the classic cannabis effects. If you’re curious about the chemistry, you can learn more about the differences between THCA vs. THC.
Skipping this step will leave you with butter that tastes like a plant but does very little else. It’s the difference between success and total failure.
Why You Need to “Activate” Your Herb
Think of it like toasting nuts or spices before cooking. The heat awakens their aromas and deepens their flavors, elevating the entire dish. Decarboxylation does the same for cannabis, unlocking its full potential through a controlled chemical reaction.
The goal is to heat your cannabis at a temperature between 220–245°F (104–118°C) for approximately 30–45 minutes. This temperature range is the sweet spot for converting THCA to THC without degrading the valuable compounds.
A Foolproof Oven Method
Achieving a perfect decarbonization is easy when you follow a precise method. Consistency is key, so pay close attention to your oven temperature and timing.
Here is an actionable, step-by-step process:
- Set the Oven: Preheat your oven to 240°F (115°C). Many home ovens run hot or cold, so using a standalone oven thermometer is a practical step to ensure accuracy.
- Prep the Pan: Line a baking sheet with parchment paper. This prevents sticking and makes cleanup effortless.
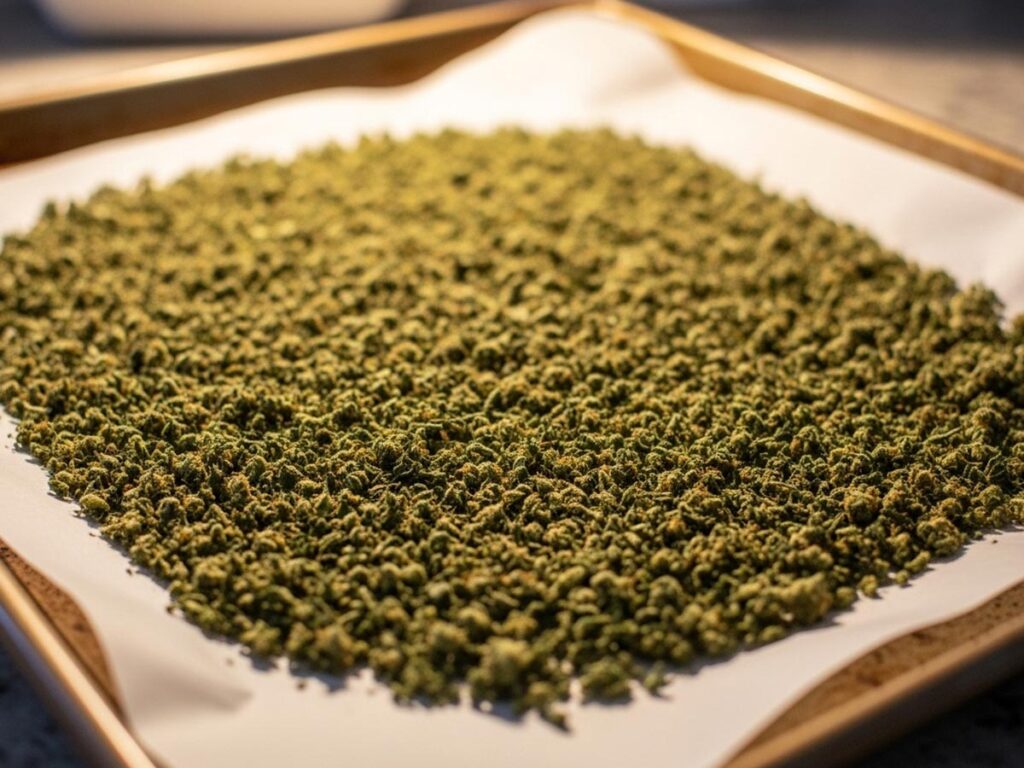
- Spread it Out: Coarsely grind your cannabis and spread it in a single, even layer on the parchment. Avoid overcrowding the pan; proper air circulation is crucial for an even toast.
- Bake and Watch: Place the baking sheet in the oven for 30-40 minutes. Gently stir the cannabis halfway through to promote even heating.
What to Look For: Perfectly decarboxylated cannabis will be a light golden-brown color and will make your kitchen smell distinctly earthy and aromatic. If it looks dark brown or smells burnt, you’ve gone too far.
Mastering this technique is what separates novice attempts from professional-quality homemade edibles. It guarantees that every gram of cannabis is working at its full potential, leading to potent, predictable, and effective cannabutter.
The Art of a Slow and Steady Infusion
With your cannabis activated and ready, it’s time for the most transformative step: the infusion. This is where we gently transfer those potent compounds from the plant material into the rich fat of the butter. The guiding principle here is unwavering: patience. A low, slow simmer is the secret to creating powerful cannabutter that tastes clean and delicious, not burnt or bitter.
We’ll start with the classic stovetop method. It’s a hands-on approach that offers you complete control over the final outcome.
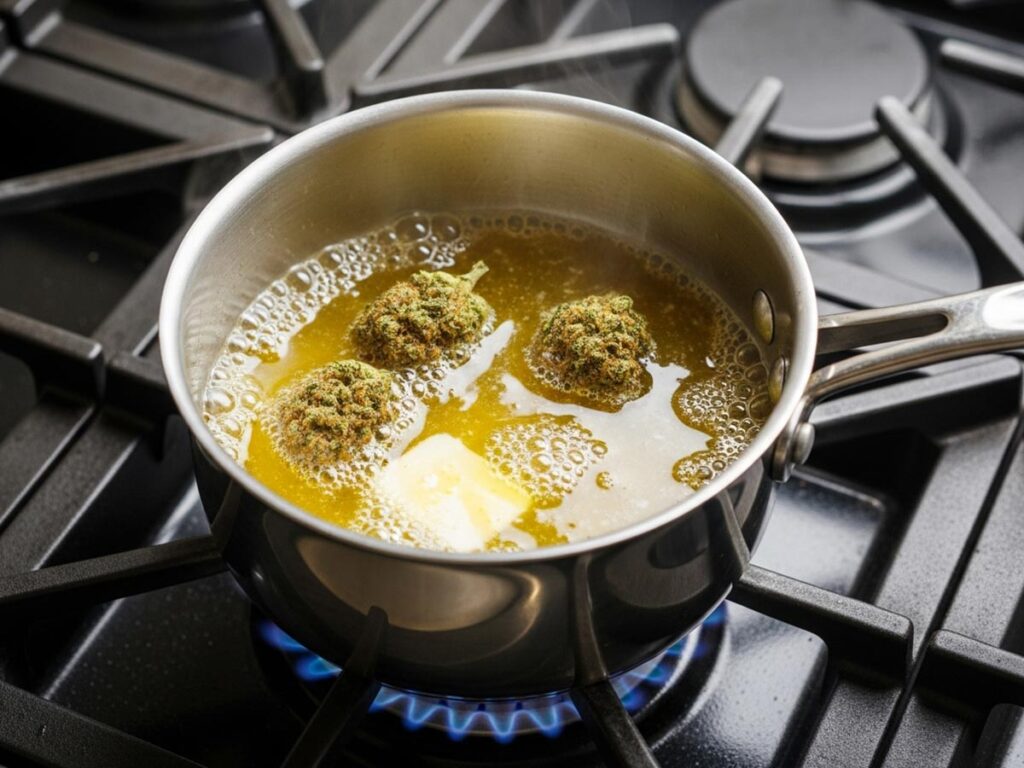
Mastering the Stovetop Simmer
The stovetop technique is a time-honored classic for good reason. In a medium saucepan, combine one cup of water and one pound of butter. Allow them to melt together over low heat before stirring in your decarboxylated cannabis.
Adding water is a crucial pro tip. It acts as a buffer, regulating the temperature and preventing the butter from scorching. Butter’s smoke point is around 302°F (150°C), and the water keeps the mixture well below that temperature. The water will be removed later, leaving you with pure, perfectly infused butter.
Allow this mixture to simmer gently for 2 to 3 hours. Stir it every 30 minutes to ensure even infusion. You are looking for a very gentle simmer—just a few lazy bubbles rising to the surface, never a vigorous boil.
Pro Tip: The ideal infusion temperature is between 160°F and 180°F (71°C to 82°C). A simple kitchen thermometer removes the guesswork, but if you don’t have one, just ensure the mixture never reaches a boil.
The Slow Cooker Alternative
For a more hands-off approach, the slow cooker is your best friend. It excels at maintaining a consistent, low temperature for hours, making it virtually foolproof.
Here’s the set-it-and-forget-it method:
- Combine your decarbed cannabis and butter directly in the slow cooker (no water needed for this method).
- Set the cooker to its lowest possible heat setting.
- Let it infuse for 4 to 6 hours, stirring once or twice if you remember.
This method is perfect for busy days and is an excellent entry point for anyone new to baking with cannabis, as it guarantees great results with minimal effort.
Whichever method you choose, the goal is the same: a slow, gentle heat that effectively transfers the cannabinoids from the plant into the butter. This patient process is what creates a truly premium product you’ll be proud to use in any recipe.
Straining and Storing Your Cannabutter
You’ve patiently supervised the infusion, and now you’re on the home stretch. The final steps—straining and storing—are what elevate your cannabutter from good to great. Nailing this part ensures a clean, potent, and long-lasting product.
Your first task is to separate the infused butter from the spent plant material. This step is crucial for achieving a smooth texture and a pure, buttery flavor, free from any gritty or grassy notes.
The Art of a Clean Strain
Place a double layer of cheesecloth over a large bowl or heat-proof container. If you don’t have cheesecloth, a fine-mesh metal sieve will work as a substitute. Slowly and carefully pour the warm butter mixture through the cheesecloth.
Now for the single most important piece of advice in this section: do not squeeze the cheesecloth. It is incredibly tempting to wring out every last drop, but resist the urge. Squeezing forces chlorophyll and other bitter plant compounds into your butter, compromising the flavor and quality of your final product.
Let gravity do the work. Once the dripping has stopped, you can discard the plant material. The beautiful, golden-green liquid that remains is your prize.
Separating and Solidifying
Cover the bowl of strained liquid and refrigerate it for at least a few hours, or preferably overnight. As the mixture cools, a simple separation process occurs.
The pure cannabutter will rise to the top and solidify into a firm, vibrant green disc. The water from the infusion process, along with any remaining impurities, will settle at the bottom.
Once the butter is fully solid, you can easily lift the disc from the container. Pat the bottom dry with a paper towel to remove any lingering moisture, and your cannabutter is ready for storage.
Key Takeaway: Chilling the butter to separate it from the water is a non-negotiable step. This simple technique purifies your final product, improves its texture, and significantly extends its shelf life.
Proper Storage for Lasting Potency
How you store your cannabutter directly impacts its freshness and potency. For short-term use, an airtight container in the refrigerator is sufficient. It will remain fresh for up to two weeks.
For long-term storage, the freezer is your best option.
- Portion it out: Before freezing, consider portioning the butter. A standard ice cube tray is perfect for creating convenient one-tablespoon cubes.
- Wrap it up: Tightly wrap each portion in parchment paper before placing it in a freezer-safe bag or container. This prevents freezer burn and protects the flavor.
- Label everything: Clearly label the container with the date of creation and the estimated dosage per portion. This foresight will make future use much safer and more convenient.
Stored properly in the freezer, cannabutter can last for 6 months or more with minimal loss in potency. For more details on the shelf life of different edibles, check out our guide on how long edibles last.
Got Questions About Cannabutter? We’ve Got Answers.
Even experienced cannabutter makers run into questions. From managing distinct aromas to accurately dosing your creations, let’s address the most common kitchen challenges.
Consider this your practical troubleshooting guide, offering clear, actionable solutions.
How Can I Make Cannabutter Without It Smelling Up My Whole House?
The potent aroma of decarbing and infusing cannabis is a major concern for many. While eliminating the smell is impossible, you can absolutely minimize it with a few smart techniques.
- Maximize Ventilation: This is your first line of defense. Open windows, turn on your kitchen’s exhaust fan, and use a small fan to direct air outside. Good airflow is essential.
- The Mason Jar Method: For a nearly smell-proof decarb, place your coarsely ground cannabis in an oven-safe mason jar, seal it lightly, and put it on your baking sheet. Crucial safety tip: Allow the jar to cool completely before opening it to avoid a sudden release of hot steam and aroma.
- Use Your Slow Cooker: During the infusion stage, a slow cooker with the lid on is excellent at trapping odors, making it far more discreet than an open pot on the stove.
These practical tips won’t eliminate scent, but they will dramatically reduce odor and help keep your culinary activities private.
How Do I Know How Strong My Cannabutter Is?
Dosing homemade edibles requires a bit of math, but you can get a reliable estimate. The potency depends on the THC percentage of your starting flower and your infusion efficiency. As a conservative rule of thumb, assume an infusion efficiency of 70-80%.
Here’s a practical example: You start with 7 grams of flower tested at 20% THC.
- Calculate total available THC: 7 grams = 7000mg. 20% of 7000mg is 1400mg of THC.
- Factor in infusion efficiency: Assuming a 70% efficiency, you’ll capture approximately 980mg of THC (1400mg x 0.70) in your final butter.
- If you infused this into one cup of butter (16 tablespoons), each tablespoon would contain roughly 61mg of THC (980mg / 16 tbsp).
Always follow the golden rule of edibles: start low and go slow. Test a very small amount first (a quarter or half teaspoon) and wait at least two hours to gauge the effects before consuming more. For trustworthy information on how cannabinoids interact with the body, the National Center for Complementary and Integrative Health offers excellent resources.
Why Does My Cannabutter Taste So Grassy?
That harsh, plant-like flavor is a common complaint, but it’s easily avoidable. It almost always stems from two mistakes: grinding your cannabis too finely or squeezing the cheesecloth during straining.
A fine grind is like dust, allowing excess chlorophyll and plant matter to seep into your butter. Squeezing the cheesecloth literally forces those bitter compounds into your final product.
The solution is simple: use a coarse grind and let gravity do the work when you strain. Patience during this final step is rewarded with a much cleaner, more palatable cannabutter. Remember, the goal is to infuse fat, not to create a plant-based puree.
Ready to find the perfect flower for your next cannabutter creation? At Wallflower Cannabis House, our knowledgeable budtenders are passionate about helping you select the ideal strain for your desired experience. Visit one of our Las Vegas locations or browse our menu online.